Introduction
This guide provides an end to end explanation of the qualifying, onboarding and activation process for a new merchant to the Xendit regional account.
Workflow to activate a merchant
Step | Done by |
|---|---|
Qualifying a merchant | Sales, Product, CCS |
Sending a merchant to the onboarding form | Sales, Merchant Ops |
Negotiating pricing | Sales, FX |
Setting pricing | Sales, Product |
Go live | Merchant Ops |
Qualifying a merchant
To qualify a merchant, you should refer to the Regional Account documentation first to see if your merchant’s use case is covered. Key things to be aware of are:
Generally supported use cases (see below)
Feature parity between the regional account and local accounts
Pricing and billing for the regional account is presently in USD only
Licensed FI entities require case by case evaluation by CCS
All foreign merchants are banned from accepting funds in IDR. Where necessary, you can make a special request to ID Country Office on a case-by-case basis
If you’re still unsure, you may:
Submit a request to #centralised-case-solutioning
Join the Regional Sales <> Product weekly sync to check if your use case is covered with the CCS and Product team
Supported use cases
Generally, the Xendit regional account is suitable for the following types of businesses:
Use case | E.g. Customer use cases | Xendit accounts |
|---|---|---|
US business expanding into multiple countries in Southeast Asia | E.g. Teachy, HeyLinkMe
| 1 regional account |
Business opens local operations in multiple countries in Southeast Asia | E.g. Malaysian business expanding regionally
| 1 local account for the local market, and 1 regional account for all other markets |
Bulk payouts to affiliate partners’ bank accounts in Southeast Asia | E.g.
| 1 regional account for the payouts |
Supplier and vendor payments in Southeast Asia and the rest of the world | E.g. PTTB, Common Ground
| 1 regional account for the payouts |
Remittance company paying out on behalf of senders to bank accounts in Southeast Asia |
| 1 regional account for the payouts. Requires CCS team and FX team’s sign-off |
Sending a merchant to onboard
If the merchant has been qualified, you may begin the onboarding process by sending the merchant to the onboarding for KYC documentation submission.
The onboarding flow to send your merchant to depends on the type of account for your merchant and your merchant’s country of incorporation.
Type of account | Merchant country of incorporation | Onboarding form |
|---|---|---|
Local | Any one of:
| They will receive the local account by default on the self serve onboarding form https://dashboard.xendit.co/register/ |
Local | Other country of incorporation | Direct them to https://dashboard.xendit.co/local-register/ |
Regional | Any one of:
| Direct them to https://dashboard.xendit.co/regional-register/ |
Regional | Other country of incorporation | They will receive the regional account by default on the self serve onboarding form https://dashboard.xendit.co/register/ |
(For a full overview of the onboarding process, you may refer to this training.)
Negotiating pricing
The regional account has a different pricing model from the local account. To negotiate pricing for the regional account, you will need to:
Refer to our global pricing site for the default pricing
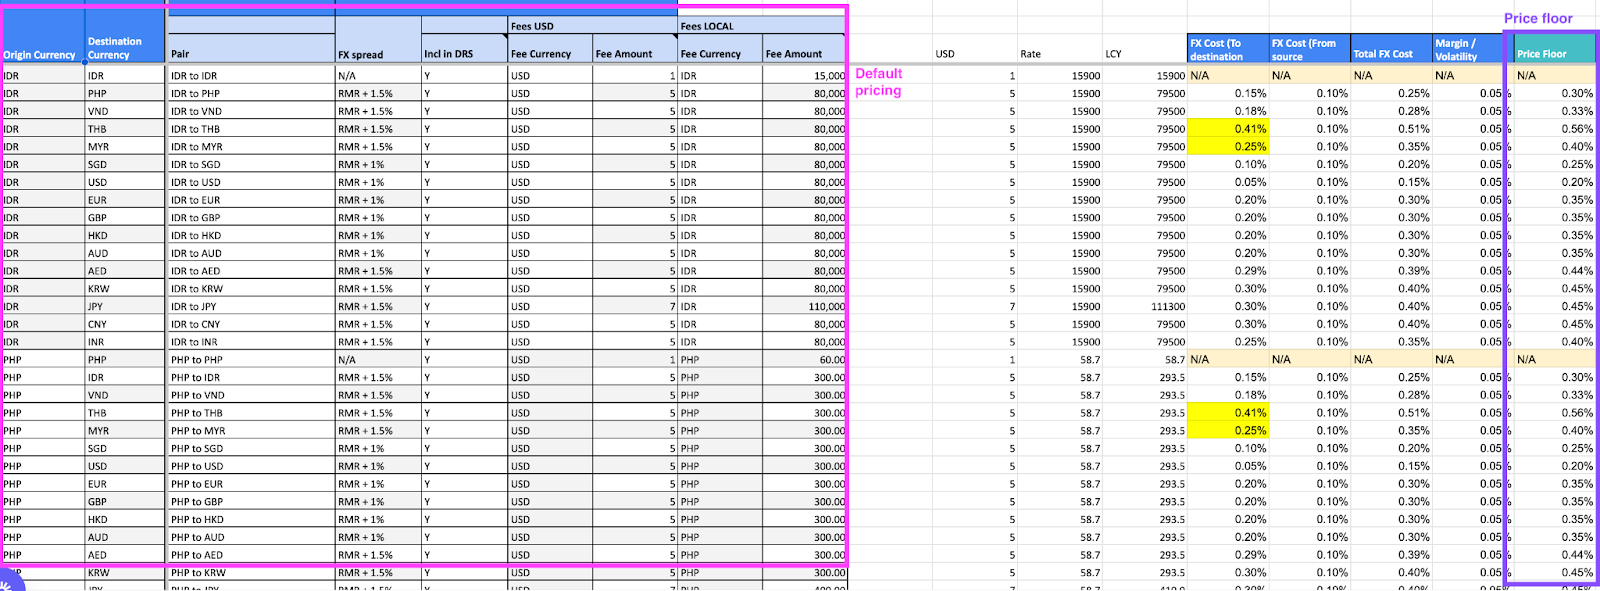
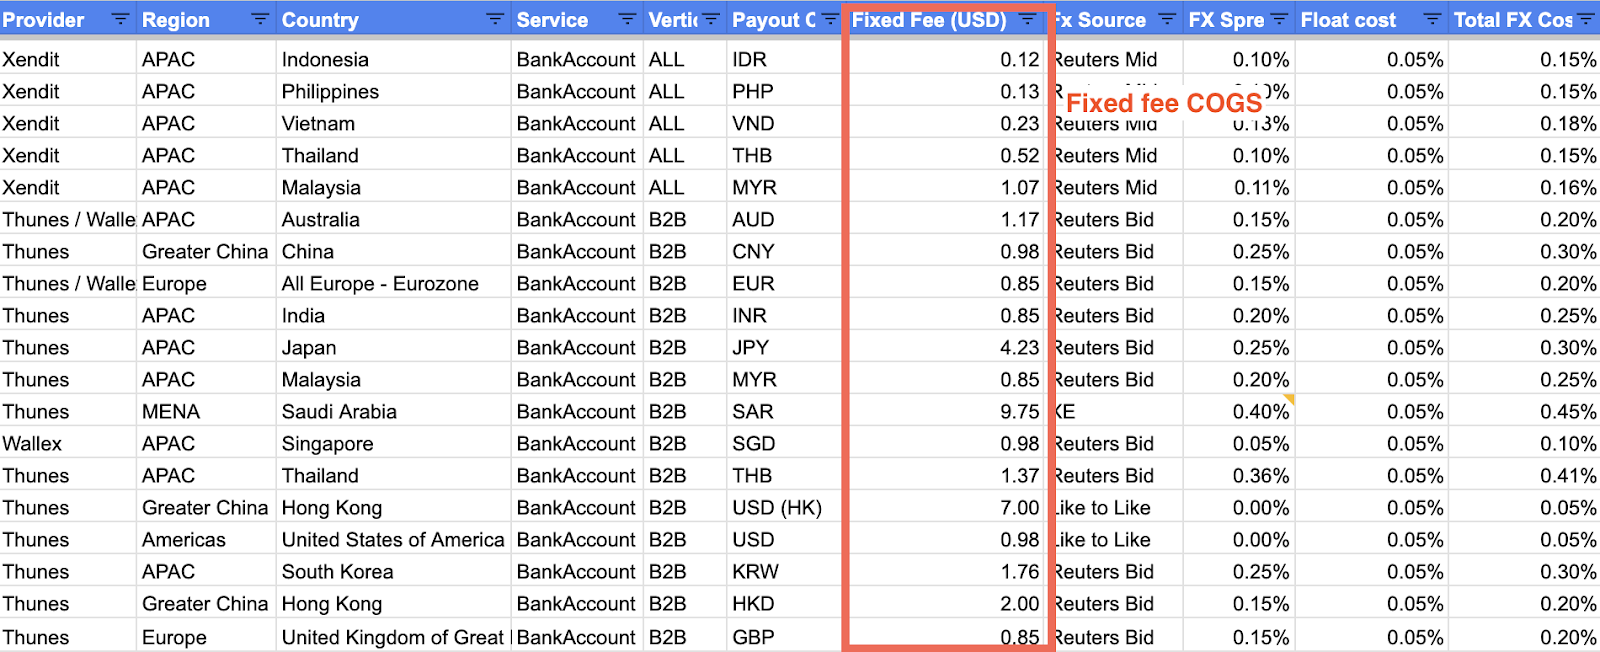
Refer to the Fee and Spread Pricing sheet for default fees, COGS and price floor for Payouts, Withdrawals, Conversions and Auto-FX on the regional account
Click each of the Auto-FX, Payouts, Conversions and Withdrawals sheets to look at the pricing details per sheet
Check default pricing on the left to see what our default rates are. You may look at our FX price floor on the right of each sheet
To look at the price floor for fixed fees, refer to the COGS sheet and refer to the Fixed Fee column
You should not go below the price floor. If you have an exceptional circumstance that requires the lowering of price below the price floor, reach out to the FX team (Axel Regnström) for approval
Select the Xendit Services Agreement: Amendment Agreement (Global Pricing) template on Spotdraft for amendment. The Pricing Amendment Agreement caters for several scenarios when negotiating foreign exchange services:
Cross border payouts and withdrawals
You may choose to negotiate EITHER of the following with your customer:
Amendment of fixed fees for defined currency pairs (no FX negotiation - default spreads apply)
Amendment of fixed fees and FX spreads for defined currency pairs
Delete the section that does not apply to your merchant
AutoFX OR balance conversion
You may quote your customer EITHER autoFX or balance conversion rates
If your customer has asked for autoFX, but ends up using conversions by opening local currency balances:
The spreads for the autoFX currencies to USD will be set at the rate negotiated for autoFX
Other spreads will be set at the default rates
Delete the section that does not apply to your merchant
Once you’ve landed on a pricing agreement, send the pricing addendum for signature via Spotdraft.
Setting pricing
Once the pricing agreement has been signed, we will need to set the fees and FX spreads for the merchant according to what has been agreed.
Fees | PIC | Steps to set pricing |
|---|---|---|
Fees | Sales | Set the fixed and variable fees that you have agreed with your merchant on the admin dashboard by following this billing guide for regional accounts. |
FX spread | Product | FX spreads cannot yet be set on the admin dashboard. Reach out to Nigel Yeo of the FX team on #wg-regional-merchants to set the FX spreads for your merchant. Attach the pricing agreement. |
Go live
MO will allow the account to go live once the customer has been approved by MO and floats are confirmed for the customer. The customer will go live with default rates and the default Xendit Services Agreement.
If you have negotiated rates with the customer, you should inform them that the default rates and the default agreement will apply until the agreement has been signed, and custom pricing has been configured.